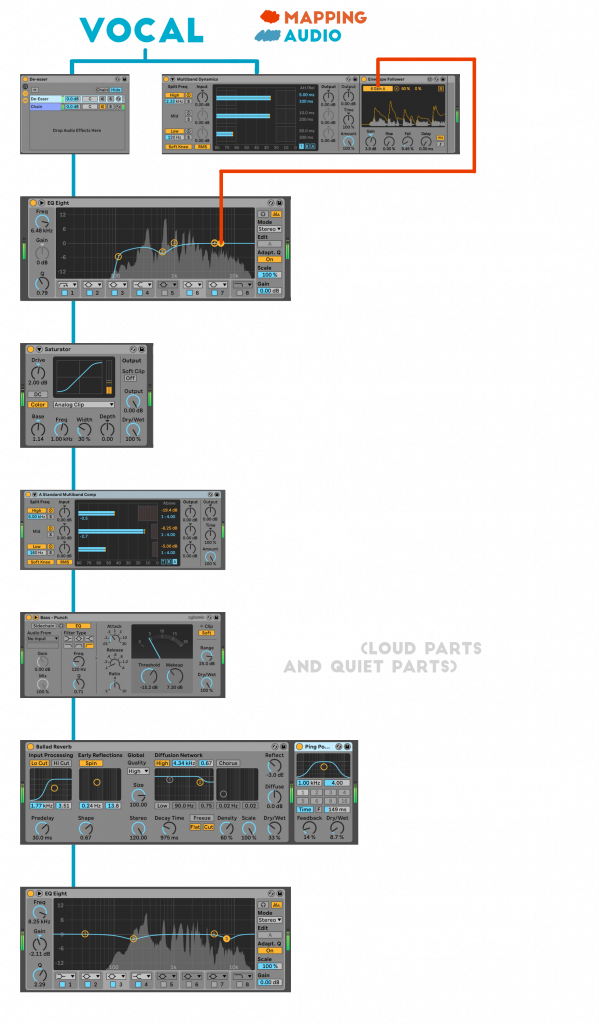
Mixing vocals is hard, but it can be easy once you have a good processing chain in place. A good vocal chain can help remove all the things you don’t want from the vocal and help place yours in the sweet spot in your mix.
We’ve captured what we think really works in a vocal chain and layered these steps out below. These steps go through tackling sibilance to adding character to be louder, warmer and less harsh!
You will need the following inside of Ableton Live:
EQ 8
Reverb
Delay/Ping Pong
Envelope Follower (max for live effect)
Saturator
Glue Compressor
Multiband Dynamics
STEP 1: DE-ESSER
First up in the processing chain is the De-Esser. This is by far the hardest part of the chain and involves a few effects, but once you’ve sorted this essential part of the vocal chain, the rest is easy.
So what does a De-Esser actually do? The De-Esser tackles the sharp sibilance sounds that come through with voice. It’s important to sort this out early on rather than later.
To start things off we need a stock Multiband Compressor with the Mid & Low Channels Muted, so only the high end comes through. After this, then place an EQ 8 After the Multiband Dynamics on the processing chain and feel free to turn on all the filter bands on this EQ.


Next up right click at the top of the Multiband Compressor effect and select “Group.” or use the shortcut “cmd + G” (mac) or “crtl + G“
Now right click on the empty space near “drop audio effects here” and select “Create Chain.” What we have done is created a split of audio, one travels down through the Multiband Dynamics and the other down this new empty chain we created.
After this Mute the chain with the Multiband Dynamics Effect on it and leave the other chain active. The Multiband Dynamic is only a trigger and we don’t need to hear its audio.
And finally Insert an “Envelope Follower” DIRECTLY AFTER THE MULTIBAND DYNAMICS (so its part of the group) and click the MAP button. Your next mouse click should be on the Gain Knob of the Filter 6 on the Equaliser we added in the first step.
From here feel Free to copy the settings below for the Envelope Follower. What we have done is created a way to duck the high end frequencies using our EQ in response to the High End Sibilance usually around 4,000 -10,000 hz.

STEP 2: EQ 8
Next up on our processing chain is the EQ 8 we added before. This helps sculpt the frequencies of the vocals and shape them.
First of all we need to move the Frequency knob/parameter of band 6 to tackle the High End Sibilance. Notice how the Gain knob is moving in response to the high frequencies? Sweep Filter 6’s frequencies around and find an area in the high frequencies where the vocal sounds clean. You can also adjust the Q for filter 6 to have a more radical cut.
From here we can remove the low end of the vocal to remove the ‘p‘ and popping sounds which get in the way and is unnecessary. Simply move the first EQ band up until you remove the bottom end of the vocal. After this we can notch out a little bit of the mid range of our vocal to make it cleaner (see EQ band 2 above)

STEP 3: SATURATOR
Next up is a personal favourite of mine the saturator!
Here the Saturator adds a little bit more warmth and character to the vocal while also raising the overall volume of the vocal.

STEP 4: MULTIBAND
To tighten up your vocal even more let
s add in a Multiband Dynamics plugin, the preset “A Standard Multiband Comp” will work great.
From here we can pull the thresholds of each filter (highlighted in red) down so we have a little bit of reduction on each compressor (shown by the blue numbers) The purpose of these 3 compressors is to catch any stray and loud parts in the vocals and just generally make the vocal more evened out.

STEP 5: COMPRESSION
We’ve got the right sound now but its a bit too dynamic and needs to be levelled out.
Drag in the “Bass – Punch” Preset from the Glue Compressor effect. Now we can adjust the attack, threshold and makeup to suit our vocals. You’ll be able to hear what each of those do. Careful not to bring the threshold down too much. See the displayed range from 0-20 we should only really be hitting 5 with the threshold. And make sure to turn the SOFT CLIP button on.

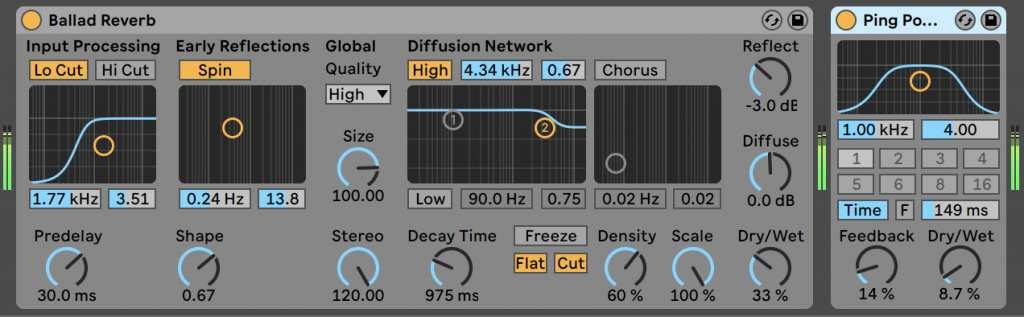
STEP 6: ROOM & SPACE FX
Now we can add reverb and ping pong delay to create room and space around the vocal. Before the vocal was sounding a bit too stale but with a reverb and ping pong delay (feel free to copy the settings below) we can add more depth to the vocals to bring them to life!
STEP 7: ANOTHER EQ
And to shape your vocal even more we can add yet another eq to notch out a bit more low end and other annoying high end frequencies.

FINAL THOUGHTS
Remember with Vocals there’s no one glove fits all. However with this chain you’ve covered all the essentials in creating a levelled and great vocal sound that will make them stick out in your mix inside of Ableton.
Check out the video tutorial (click here) if you want to see these methods step by step.
Check out the full vocal chain mapped out below.