Intro
Planning to collab with a buddy who also has Ableton, but don’t know what to have in place first, or worried about limitations? We’ve got you covered! This is our full guide on how to prepare your Abelton sessions for collaborations. Let’s dive in!
Backwards Compatibility
First things first. Backwards Compatibility in Ableton. Ableton Live currently is not backwards compatible. What does this mean? Essentially, if you create a project in Ableton 11 and send it to your collab buddy who only has Ableton 10, they won’t be able to open it.
So the first thing to figure out is which version of Ableton live you both have and stick to it for the collab.

Which Versions work with each other?
So now that you’ve figured out which Ableton version you’re going to use, now it’s time to figure out which edition to work in since Ableton has 3 different editions: Intro, Standard and Suite.
Each have their own limitations (except for Suite) so its import to figure out which features such as “audio effects, instruments or tracks” you can or can’t use if you are working with different editions. Click here to get a full run down of Ableton’s different Editions and their features.
But if you both have the same version of Ableton and the same edition, this makes things really easy and you won’t need to keep in mind which features you can and can’t use since you can use them all. It’s only when you cross different editions you’ll need to keep note of what’s mentioned above.

What to do with 3rd Party Plugins (Vsts):
Yet another you’ll need to keep in mind when collaboration is which 3rd party VSTs you both plan to use (if you want to use them) ie xFer Serum, iZotope Ozone, Native Instruments Massive (plugins that aren’t made by Ableton) so its important to discuss this early on.
However if one collab buddy has for instance, the plugin “Serum” and the other doesn’t, there is a way to still incorporate the plugin into your project and that is with the “Freeze and Flattening” feature.
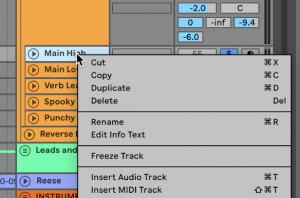
If you aren’t familiar with this Ableton feature, it’s a really handy way to free up CPU and share projects if different users don’t have the same plugins. How it works, is if you right click on the name of a channel and scroll down to the feature ‘Freeze.’ Once activated this ‘freezes’ your channel in place by rendering it to audio while maintaining the track’s settings. So this way you still get to hear exactly what that track is playing, but won’t be able to edit any settings (aside from mixer controls, like volume and pan)
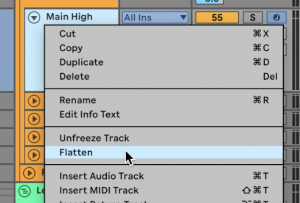
Once a track is frozen, if you right click on the name, you’ll have the ability to do 2 things, either unfreeze the track to return it to its settings before and retain its full functionality. Or Flatten the track to permanently render it as audio to further edit it.
So for an example. Say you’ve been using 3 different Serum Vst synths across your track and find out that your collab buddy doesn’t have Serum. Not to worry, hold ‘shift’ + click on the names of each of those channels, then right click and freeze them (once you’ve finished working on the session.)
This locks those 3 channels with Serum into place. Then once your collab buddy opens up the project, they can still hear the 3 Serum synths in the project and work on the song even though they don’t have Serum.
Once they send it back, you can go back into the tracks that have Serum, ‘right click’ on their names and unfreeze them if you want to work on them again.
This is an extremely useful feature if someone has a 3rd party plugin that the other doesn’t.
How to save the right way for Collaboration.
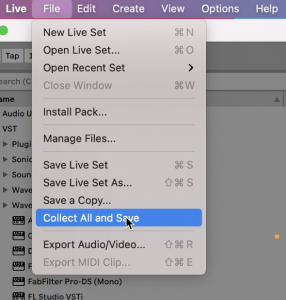
Did you know… normal saving won’t encapsulate everything in your Ableton session, only your project info and relevant recordings. To grab absolutely everything including external samples, select “FILE” and “COLLECT ALL AND SAVE.” Here you’ll be presented with a few checkboxes on what you want to collect into your project (I usually select all of them just in case) and then OK.
What this does, is grabs all your samples you used in the project and copies them to the folder where you Ableton Project is stored. This makes sure your collab buddy has all the necessary samples needed to run the project.
Sending the Project
Once you’ve done your collect all and save and located the folder where your project is stored. (the location where you saved it from the last step) From here you’ll want to grab the entire folder (not just the .als file) but the folder that the .als file is inside!
If the folder you’ve selected contains your project file (.als file) a “Samples,” “Backup,” and “Ableton Project Info” folder, you’ve grabbed the right one.

Now you’ll want to send this entire folder to your collab buddy. Most likely the folder will be too big to fit in an email, but there are many files sharing websites/services out there that you can use to send your file. ie. We Transfer, Mediafire, Google Drive, Dropbox etc etc.
That all?
And that’s that, make sure your collab buddy repeats the relevant steps above if they need to freeze specific tracks since have 3rd party plugins that not everyone in the collab has. And Collect All and Save before they send it back! Enjoy your collab, hope you enjoyed this guide on how to prepare Ableton for collaborations! If you want to check out the video version of this how to guide, watch at the top of this page 🙂